


When people contact your business, you want to make the most of that interaction. It’s critical to route every call to the right staff member, every time, with the context your team needs to follow up.
Did you know that CallRail can help you customize those call experiences?
Whether you’re creating a basic menu that sends sales calls to one phone number and support calls to another, or crafting an intricate geo-routing step that directs calls based on zip code and area code, the Call Flow Builder is here to help. And, when you combine call flows with Lead Center, you’ve got a best-in-class business phone system, powered by automation and robust reporting.
Follow these pro tips to get the most from the Call Flow Builder and CallRail.
1) Create a Custom IVR System
Creating a Menu step inside the Call Flow Builder allows you to configure an advanced Interactive Voice Response (IVR) system for your business in just a few clicks. You can upload your own recording of your menu options or choose from five different text-to-speech languages including English, Spanish, and Portuguese.
The Call Flow Builder gives you the ability to create up to 13 different menu options that can take your callers in almost any direction they’d like.
In this example we’ll create a basic menu that can route callers to our sales team, support staff, or marketing department. Start by choosing where each menu prompt will direct the caller:

Now that we’ve established three different options and written a greeting for the menu, we can start choosing where each prompt will route the caller.
Learn more about the Menu step in this help article.
The Simulcall step is perfect for callers that are trying to reach a large sales or support team. If the caller presses 1 for sales, we can insert this step to make multiple phones ring at once until someone answers. Simulcall also gives you the option to use a personalized prompt that routes previous callers to the number that answered the last time they called.

Learn more about the Simulcall step in this help article.
For customers trying to reach your billing department, it might be a better option to use a Dial step that routes them to a specific employee who can best serve them. Just return to the first step of your call flow and highlight the marketing menu option. From here, you can select the Dial step.

Learn more about the Dial step in this help article.
CallRail’s IVR even allows you to choose where a call will go and what happens next if the person doesn’t answer within a certain amount of time.
2) Establish a Schedule
The Call Flow Builder keeps your time in mind. Using the Schedule step, you can route callers to different phone numbers based on your business hours. That means your callers reach the right destination no matter when they choose to pick up the phone.
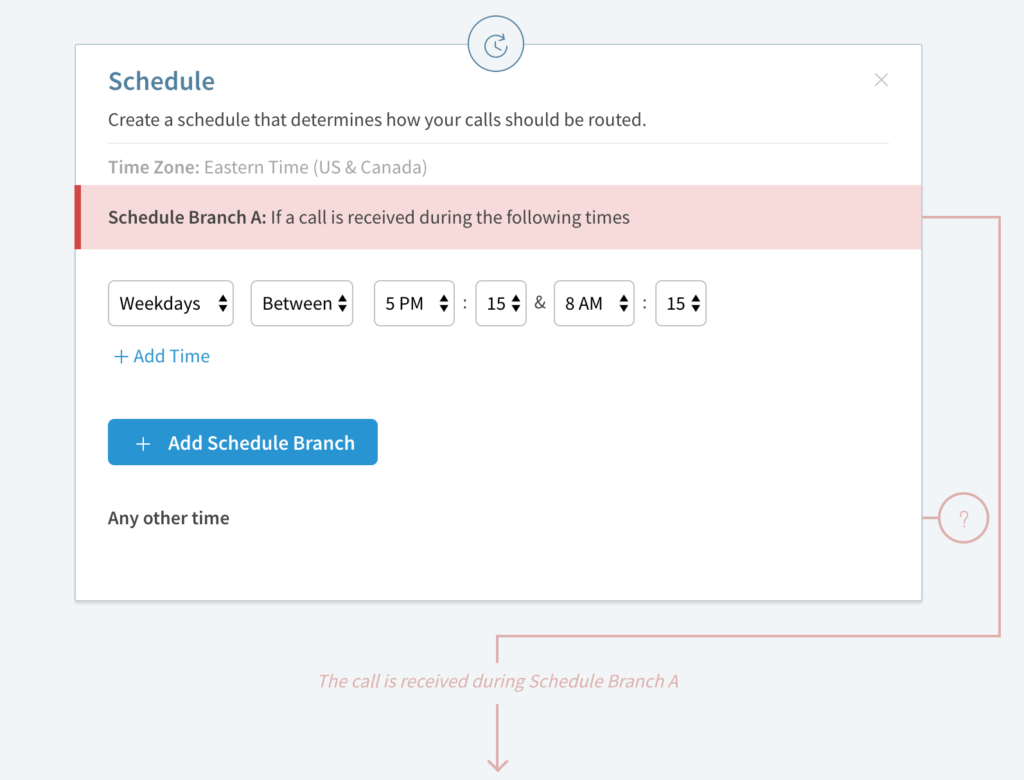
In addition to scheduled changes to your operating hours, Lead Center can accommodate atypical schedules or employees that unexpectedly need to take time off. To avoid the need to adjust your Call Flow schedule step each time someone’s hours change, Lead Center’s agent availability setting automatically updates to route calls only to those logged in and available to take them, so you don’t have to make manual changes to your regular call routing schedule. This ensures you don’t miss out on opportunities.
Want to send calls to your office by day, but to a call center by night? Should weekend callers reach a menu that includes your business hours and a voicemail? These options and more are possible with the schedule step.
Learn more about the schedule step in this help article.
3)Put a Tag on it
One of our favorite Call Flow Builder tricks comes with the Tag step. If you are using a menu in your call flow setup, add a tag after each prompt and before the next step.

This will automatically tag and categorize calls in your account based on where they were routed. These tags will appear on calls in both the call log and in Lead Center. It’s easy to stay organized when you’ve got automation on your side!
Learn more about the tag step in this help article.
4) Set up Call Queues
Lead Center unlocks call queues, where you can place callers in a line to be answered by the next available agent. Lead Center allows your agents to set their availability. Calls will only ring for those who are not on another call and are set as available. You can also give callers an estimated wait time while they are waiting to speak to someone.
5) Duplicate your Call Flows
Creating the perfect call flow for your business is an art form. You can spend plenty of of time tweaking steps, rerouting specific callers, perfecting your greeting, and getting things just right. That’s why we’ve made it easy to duplicate your favorite call flows and even move them between the companies in your account.
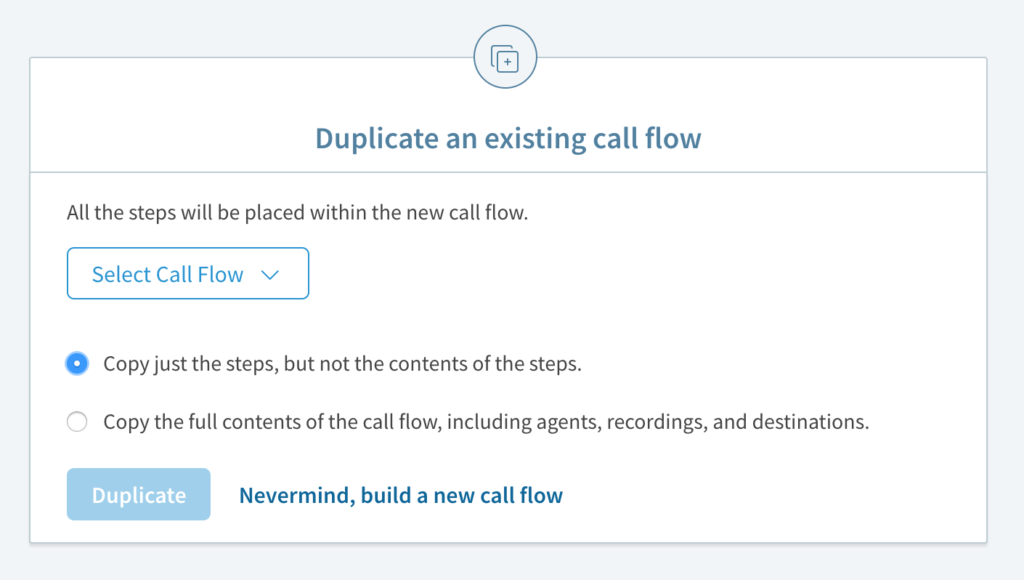
Select “Duplicate steps from an existing call flow” at the top of the Call Flow Builder, then choose whether to copy only the steps of your call flow or the full contents including agents, recordings, and destinations.
Learn more about duplicating call flows in this help article.
The Call Flow Builder provides an endlessly customizable experience for each of your tracking numbers.
Is everyone in Lead Center who needs to be?
As you set up your Call Flows, is everyone in your organization who speaks to customers set up as an agent in Lead Center? When your entire team is in Lead Center, you can:
- See how your team is doing in Team View
- Transfer calls to other agents within Lead Center
- Call other agents directly in Lead Center
- Give everyone access to the shared inbox
- See all calls and texts for your business away from your desk


